-
Encapsulation with Swift PropertyWrappers
Working in Swift when writing a class (or struct) it is valuable to make things
privatewhere possible. However, you are looking to expose properties from that structure for use elsewhere.A common case I’ve found for this is when using a reactive framework like
RxSwiftorCombine. Using MVVM it common to have aSubjectvariable (e.g.CurrentValueSubject) stored as in instance variable of your ViewModel. That ViewModel can send events to its subjects, and whatever ‘owns’ the ViewModel (e.g. a View/ViewController) can subscribe to the observable stream.What you don’t want with this setup is for the ViewModel’s owner (or something else) to be able to send events to the ViewModel’s subjects. Propagating data from multiple places is something that makes a reactive system hard to maintain.
An easy way to avoid this, is to make your
Subjectprivate, and separately expose anAnyPublisher, which type erases your subject (this is even required if you want to conform to a protocol containingAnyPublisher, as you need to manually type erase the subject to a publisher). In Combine, that might look like this:class ButtonViewModel { var isEnabled: AnyPublisher<Bool, Never> { return isEnabledSubject.eraseToAnyPublisher() } private let isEnabledSubject = CurrentValueSubject<Bool, Never>(false) }This is a reasonable approach and should work. However, I find it ‘noisy’, if you have a few publishers it can get busy.
An alternative approach, is to use Swift’s new property wrappers. I investigated using these as a syntactic sugar for the above definitions, but found the encapsulation properties of property wrappers were ideal for this scenario.
The
propertyWrapperin question looks like the following:@propertyWrapper struct CurrentValueProxy<Element, Error: Swift.Error> { let subject: CurrentValueSubject<Element, Error> init(_ value: Element) { self.subject = CurrentValueSubject(value) } var wrappedValue: AnyPublisher<Element, Error> { return subject.eraseToAnyPublisher() } }It takes the initial value for the
CurrentValueSubjectas an argument, and for it’s wrapped value, it returns the type erased subject. The interesting part though, is that thesubjectproperty in above struct is only accessible by the class/struct containing the property wrapper.If we were to update the previous ViewModel example to use that, we’d have something like this:
class ButtonViewModel {

    @CurrentValueProxy<Bool, Never>(false) var isEnabled

}
Now using the above, you can access the underlying
CurrentValueSubjectfrom within the ViewModel by doing_isEnabled.subject. Outside the ViewModel, only theAnyPublisheris available, which gives us the same scoping functionality as the more-verbose example above.RxSwift/Combine is the best usage of this that I’ve found, but there are likely other cases that might be useful. Perhaps if you want to expose a
UIViewin a sub-view without exposing the specific subclass and its properties? The unfortunate thing is that you need to write a propertyWrapper for each mapping of Private Type -> Internal Type that you want, Swift doesn’t support having a generic that extends a second generic unfortunately. -
Yamaha THR10ii Wireless
The Yamaha THR10ii Wireless is an excellent amplifier. I got one back in February and this week I (finally) took delivery of the Line 6 G10t wireless jack to go with it. Here‘s what I like and what I don’t like about this amp.

The amp sounds great and has a lot of options. Every sound on this amp is digitally modeled. You can choose between the ‘amp’ you want to simulate, the size of the room you are in (for reverb), add basic effects like ‘chorus’, ‘phaser’, or ‘tremolo’ and add compression. Much of this can be controlled via the hardware dials and buttons, though you can edit everything from the connected app (more on that later). I like having the two options as it means I can change the sound from the other side of the room.
The size of this amp is ideal for me. I play at home and can’t play loud because of the neighbours. As all the effects are simulated, you can play quietly and still get a good distorted sound.
You can connect the THR to your devices in a few different, useful ways.
- Plug in a phone/laptop via aux to play music
- Connect via Bluetooth and play music
- Connect as a Bluetooth Midi device (this is separate to Bluetooth audio). Which is how you connect to the amp in the app for Android/iOS. I’ve used older ‘smart guitar tech’ before that relied on plain old bluetooth and it was painful. Bluetooth midi devices are far more reliable, I’ve had no issues using it.
- Plug in via a midi cable at the back to not only play music through the amp, but also record output from the amp. There is a setting that allows for a flat passthrough of audio, which allows you to utilise whatever sound simulation you want on your laptop/tablet. The midi cable is also used to connect to the excellent desktop app for editing settings/updating the amp.
I plug in via USB to my iPad and either record videos using the iPad camera (the recorded audio is the output of the amp, which sounds great!) or straight into GarageBand. When shopping around for a new home-playing device, I almost went for the Boss Waza Air wireless headphones. But I like being to record attempts at playing songs, and the THR makes that easy.
I use the THR as a speaker for my phone. Thanks to its aux cable input, you could connect a Chromecast Audio or Echo Input and use it as a smart device. We have a few speakers around the flat, but none as loud as this. It’s not a bass strong sound, which is fair enough given its prime use is for guitar, but it sounds clear and can go loud without breaking up.
The wireless features of this amp are fantastic. I’ve always wanted a wireless guitar setup. I hate having cables lying around, and I equally hate the process of getting cables out and putting them away after playing. My electric guitar got left in favour of my acoustic whenever I wanted to mess about for a little.
However, I am concerned about the long term reliability of the G10t wireless adapter. It was recalled for a few months due to cases of overheating or failing. When I got mine (months after I got the amp, due to the recall) it took a few hours of plugging it into the amp, unplugging it, trying it, and plugging it back in again before I got any sound. This may have been that its battery was completely dead, due to long shipping times but it has not filled me with the confidence I want in a new product. Sure the adapter is “only” about £70, but, it’s the only wireless adapter compatible with the THR. It was a large part of the reason I got the amp in the first place, if the adapter is prone to breaking, it leaves a bad mark on an otherwise robust product. Reliability aside, the adapter is great, it charges by being plugged into the amp and I don’t notice any lag in playing at all.÷
Being able to unplug the amp and carry it to another room on battery power is super handy, it feels odd being able to walk around, untethered, music playing.
One thing I wish I could do is connect wireless headphones. I know that bluetooth can’t manage the latency, but if Yamaha made fancy 2.4ghz headphones that I could buy to go with the THR, I would do it. It’s funny, we’ve had wireless headphones for years, when I finally get a wireless guitar and wireless amp, the possibility of wireless headphones is gone.

If you have any questions about this amp feel free to fire me an e-mail. I’ve not attached any audio clips, but there are hundreds of sound demos available online elsewhere.
-
A Weekend In Fortrose
Clips from a last minute trip up to the Black Isle for the weekend.
-
Tartine Croissants
I recently picked up a copy of the revised edition of
Tartineby Elizabeth Prueitt and Chad Robertson. I’ve already got the excellentTartine Bread,Tartine Number 3andTartine All Daybooks and have been looking forward to their latest release.My first big bake from the book was a batch of croissants. I’ve made the hybrid naturally leavened croissants from Tartine Bread and although I was happy with them at the time, I think they could have been better and I was also curious to try this simpler, purely yeasted rendition.
The making process did not go smoothly. I drove home with the dough halfway through the bulk rise and it exploded out of its cling film wrapping. Then as the butter laminated rolls of dough cooked, all that butter started melting. There was butter everywhere.
Despite all of this, when I eventually pulled them out of the grease-laden oven, I could not have been happier with the results.


-
Flattening Typescript Union Types
In this post I describe how to flatten a union of two objects into one object - like joining two database tables. Click here to jump straight to the type alias for that
Union Types
Union Types in Typescript are a powerful way to describe a value that could be one of two or more types. They are useful in codebases that are transitioning from Javascript to Typescript, where one function may accept an input parameter that can be one of several different types.
Here‘s an example of that in action, taken from the Typescript docs:
/**
 * Takes a string and adds "padding" to the left.
 * If 'padding' is a string, then 'padding' is appended to the left side.
 * If 'padding' is a number, then that number of spaces is added to the left side.
 */
function padLeft(value: string, padding: string | number) {
    if (typeof padding === "number") {
        return Array(padding + 1).join(" ") + value;
    }
    if (typeof padding === "string") {
        return padding + value;
    }
}
Coming to Typescript from a background of using Swift, I found myself rarely using union types. I preferred writing things that either used concrete types or generics. However, I recently discovered the
typeofoperator in Typescript and have been loving using it.Typeof
The
typeofoperator allows you to create a type alias for the type of any typescript variable. When I first read about this operator I was thinking “Why would you want to do that?“. It wasn‘t until I was converting a large amount of Javascript code to Typescript that I saw the usefulness of it. Typescript is great at inferring the types of variables you’ve written.typeofallows you to pass around inferred types and in some cases that means that you can avoid writing types and interfaces yourself.Now, that’s a lot of abstract information, how does that look in practice?
My favourite use of
typeofhas been in a codebase I work on where we build several ‘apps’ from one codebase. All these apps have differentconstants.tsfiles.typeofandimport()have been incredibly valuable in automatically generating types for these files that can be passed around the codebase.// app-one/constants.ts export const COOKIE_KEYS = { AUTH_TOKEN: ‘X-Auth-Token’ } export const CURRENCY = ‘USD’// app-two/constants.ts export const COOKIE_KEYS = { AUTH_TOKEN: ‘AUTHENTICATION_TOKEN’, LOGIN_TOKEN: ‘X-Login-Token’ } export const CURRENCY = ‘GBP’// shared/constants.ts type AppOneConstants = typeof import(“../app-one/constants”) type AppTwoConstants = typeof import(“../app-two/constants”) type AppConstants = AppOneConstants | AppTwoConstants// src/api/middleware/authenticationMiddleware.ts const authenticationMiddleware = (request: Request, constants: AppConstants) => { request.addHeader(constants.COOKIE_KEYS.AUTH_TOKEN, ‘some-token’) }Without
typeofusages, we’d have to write and maintain anAppConstantsinterface that aligns to the constants files of each app. In addition to this, Typescript’s inference system can type things better than you as a developer can. For example, in the above code snippets, if you had written the type ofAppConstantsyourself, you might have saidCOOKIE_NAMEShas a property ofAUTH_TOKENthat is astring. However, the inferred type will tell you thatAUTH_TOKENis’X-Auth-Token’ | ‘AUTHENTICATION_TOKEN’. This extra bit of context can be useful.Type inference has uses in other contexts. You could infer the type of an API response from a mock JSON file; or you could have varied
Storageobjects for a Web app versus a ReactNative app; any time that you’re having to write a lot of types with Typescript, it’s worth thinking if there’s a way you can have that type inferred for you.Merging Union Types
Now, inferred types are great, but when you are saying something is the union of two inferred types, there will be cases where the two types don’t share properties. In this case, shared properties will be accessible on the union type, unless you add a type check to confirm which side of a union your instance comes from.
Take the following data structures of a Superhero and Teacher for example:
const spiderman = {
    pseudonym: 'Spiderman',
    height: 150,
    address: {
        id: 500,
        headquarters: 'Avengers HQ'
    },
    photos: [{ id: 1, name: 'spidey.jpg' }, { id: 4, name: 'doc-oct.jpg' }, { id: 5, remoteUrl: 'https://www.spiderman.com/image1.jpeg' }]
}

const mrTilbury = {
    firstName: "Arthur",
    secondName: "Tilbury",
    height: 180,
    subject: "Art",
    address: {
        id: 1231,
        streetAddress1: '1 Cadbury Lane',
        city: 'Norfolk',
        postcode: 'N1 KE5',
    },
    degree: {
        university: 'Glasgow',
        subject: 'History of Art'
    }
}
type Teacher = typeof mrTilbury
type Superhero = typeof spiderman

type Person = Superhero | Teacher
Now, as Teacher and Superhero both have a height property, I can access height on an instance of the union type:
const getHeightDetails = (person: Person) => {
	const heightInCm = person.height // OK, as both Superhero and Teacher have height
	return heightInCm
}
But what if we want to try and use the
subjectproperty on a teacher?const getSubject = (person: Person) => { return person.subject // Compile error! }Annoyingly, although
Personis a union of aSuperheroand aTeacher, we get a compiler error on trying to accessperson.subjectbecauseSuperherodoes not contain a subject property. (I would typescript ‘flattened’ these union types for you. Such that aPersonhad a property ofsubjectthat wasstring | undefined.)To handle this use case, Typescript offers a feature called “Discriminating Union Types”. This technique involves you adding a constant property to each side of a union that acts as a unique identifier for that type in the union. You can check if a property is ‘in’ the variable that is unique to one side of the union, e.g photos on Spider-Man. However, this value might change, or the Teacher type may later get photos and you’d have to update all usages of discriminating by photo to instead discriminate by another property.
interface Superhero {
	type: ‘PERSON’
	...(other person values)
}

interface Teacher {
	type: ‘TEACHER’
	subject: string
	...(other teacher values)
}

type Person = Teacher | Superhero

const somePerson = {
	type: ‘TEACHER’,
	subject: ‘Maths’
} as Person // Just using `as` for the example

if (somePerson.type === ‘TEACHER’) {
	console.log(somePerson.subject) // Valid!
}
By checking the
type(our discriminator) isTEACHER, we can access all properties that are unique to a Teacher and not in Superhero. This is useful and allows us to access properties in one side of a union. However, it can be annoying to add a discriminating value to your objects (sometimes not possible), and it adds an unnecessary runtime cost.FlattenUnion
Now, the main point of this post. There is a way that we can generate a
Persontype that makes properties of both types in the union accessible, whilst maintaining type safety.// Converts a union of two types into an intersection // i.e. A | B -> A & B type UnionToIntersection<U> = (U extends any ? (k: U) => void : never) extends ((k: infer I) => void) ? I : never; // Flattens two union types into a single type with optional values // i.e. FlattenUnion<{ a: number, c: number } | { b: string, c: number }> = { a?: number, b?: string, c: number } type FlattenUnion<T> = { [K in keyof UnionToIntersection<T>]: K extends keyof T ? T[K] extends any[] ? T[K] : T[K] extends object ? FlattenUnion<T[K]> : T[K] : UnionToIntersection<T>[K] | undefined } type Person = FlattenUnion<Teacher | Superhero>(Note: this is using recursive types, a new feature of Typescript 3.7. Without recursive types, we‘d have to write a ‘finite’ version of this calling FlattenUnion -> FlattenUnion2 -> FlattenUnion3 for each nested object in a union)
By doing this, we now have a type that allows us to safely access any property on either side of a union. Going way back to the example at the top, we can now access deeply nested properties without having to check if each nested object contains a value for a key.
type Person = Teacher | Superhero
type SafePerson = FlattenUnion<Person>

// Using discriminating union, we have to check a property to verify the type
const getPhotoWithId = (person: Person, id: number) => {
    if ('photos' in person) {
        return person.photos.find(p => p.id === id)
    }
    return undefined
}

// Using FlattenUnion
const getPhotoWithId = (person: SafePerson, id: number) => person.photos?.find(p => p.id === id)
(Note: this is using the new nested optional syntax in Typescript 3.7)
By using the FlattenUnion version, we don‘t have to inspect the property to verify our photos property exist. We can autocomplete all properties - something that doesn‘t work with the discriminated union version as the keys on both sides of the union are suggested by Typescript.
How is this
FlattenUnion<T>working?To break it down, we take a type T and call
K in keyof UnionToIntersection<T>. A simplekeyof Twould give us the set of keys that are in both sides of the union, whereas swapping the union for an intersection means that we get all keys, even if they are only in one side of the union.Now, for every key we say if that key is in
keyof T(i.e. is this key in both sides of the union) then we want to use that value as is - it is not optional and we know it exists in both sides of the union. We want to say, take this value, and if it is an object, return the FlattenUnion of that object (the recursive part). However, before we can think about usingFlattenUnion, we have one edge case to cover first - arrays in Javascript are objects. We say if the value is an array of any type, then leave it untouched. Else if the value is an object, recursively callFlattenUnionon the object, otherwise leave the value as it is (it is a number, string etc).If the key isn‘t in
keyof T, then we know the value is in only one side of the union, leave the value as is but add an| undefinedas we know that it is not in both sides of the union. -
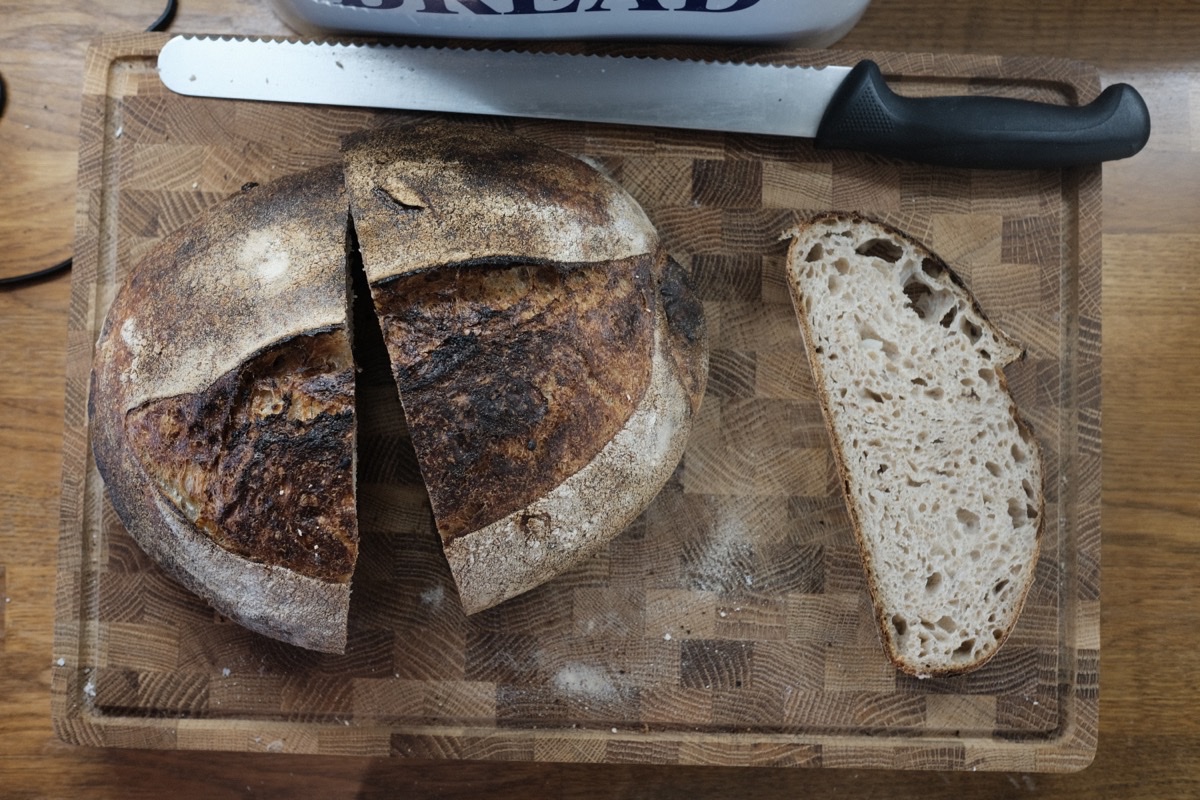
Potato Sourdough
One of the many great foods that my mum makes is potato bread rolls. These are small rolls that we have alongside a meal, made from yeasted dough and either instant or normal mashed potato. They are light in texture and taste great.
I was keen to try and bring this idea to the sourdough bread that I’ve been making as of recent. I researched online to see if there were any recipes available for this sort of dough, but I couldn’t see anything that exactly matched what I wanted - this was an open crumb and no visible pieces of potato. There were several recipes I found that were using real potatoes and mixing it in smoothly, however, the dough that they made was of low hydration, fast rise and a closed crumb. Similarly, I did find one recipe that matched those characteristics. But, it was one where you left in chunks of potato, which I wasn’t keen for.
I eventually gave up searching and just thought I’d wing it with a recipe. It turned out far better than I could have hoped, so I thought I’d share it here. It makes for a brilliantly moist crumb and flavoursome crust.

Recipe
- 400g strong white flour
- 100g whole wheat flour
- 375g water
- 11g salt
- 110g levain
- 250g potatoes, peeled and chopped into large chunks
08:00 - Prepare Levain
Prepare a levain in the morning by mixing 60 of flour, 60g of warm water and 60g of sourdough starter. (You may need to adjust ratios and timing based on the temperature of your kitchen or liveliness of your starter)
17:00 - Mix Dough & Boil Potatoes
Mix 350g water with the flour - we will save the other 25g of water for after the autolyse. Leave to rest for 30 minutes, covered. Whilst that rests, boil 250g of potatoes for 8 minutes. Once they are soft, remove from the heat and mash. Leave the mashed potatoes to cool until the autolyse is done.
17:30 - Mix Final Ingredients
Add the mashed potatoes, 11g of salt and 110g of levain to the dough and mix well. I like to use the ‘slap and fold’ technique. Cover and leave in a warm place.
18:00 - First Fold
Using a wet hand, stretch and fold the dough over itself at each corner.
18:30 - Second Fold
Repeat the previous set of folds.
19:00 - Third Fold
Repeat for the final set of folds then leave the dough to bulk rise.
22:00 Pre-Shaping
By now the dough should show visible bubbles and have risen noticeably. Turn it out onto a counter top and lightly flour one side of it. Using a scraper, starting at the floured side of the dough, pull the scraper round the dough and then back towards itself, creating a ball shape. Leave it to bench rest on the counter top.
22:45 Shaping
The dough will have spread out by now. Flour the top of it and then use a scraper to loosen it from the counter in place. Using the scraper, flip the dough so that the floured side now sits on the counter. Stitch the dough into a tight ball and place in a proofing basket. Either leave the dough to proof for 1-2 hours or put it in the fridge overnight.
08:00 Baking
If you proof the dough overnight in the fridge, the time at which you bake the next day is pretty flexible.
Place a lidded pod into the oven and preheat to 240 degrees. After 45 minutes, remove the pot from the oven and the proofing loaf from the fridge. Turn the dough out into the pot and optionally score the dough with a sharp blade. Place it back into the oven for 25 minutes. After 25 minutes, remove the lid and continue to bake for another 15 minutes.
