-
Fresh Pasta
A couple of months ago I first made fresh pasta and was amazed at how easy it was to do - it requires just two ingredients and can be done in 15 minutes. In the summer my Mum’s hens lay more eggs than she knows what to do with at times and this is a delicious way to make use of them.
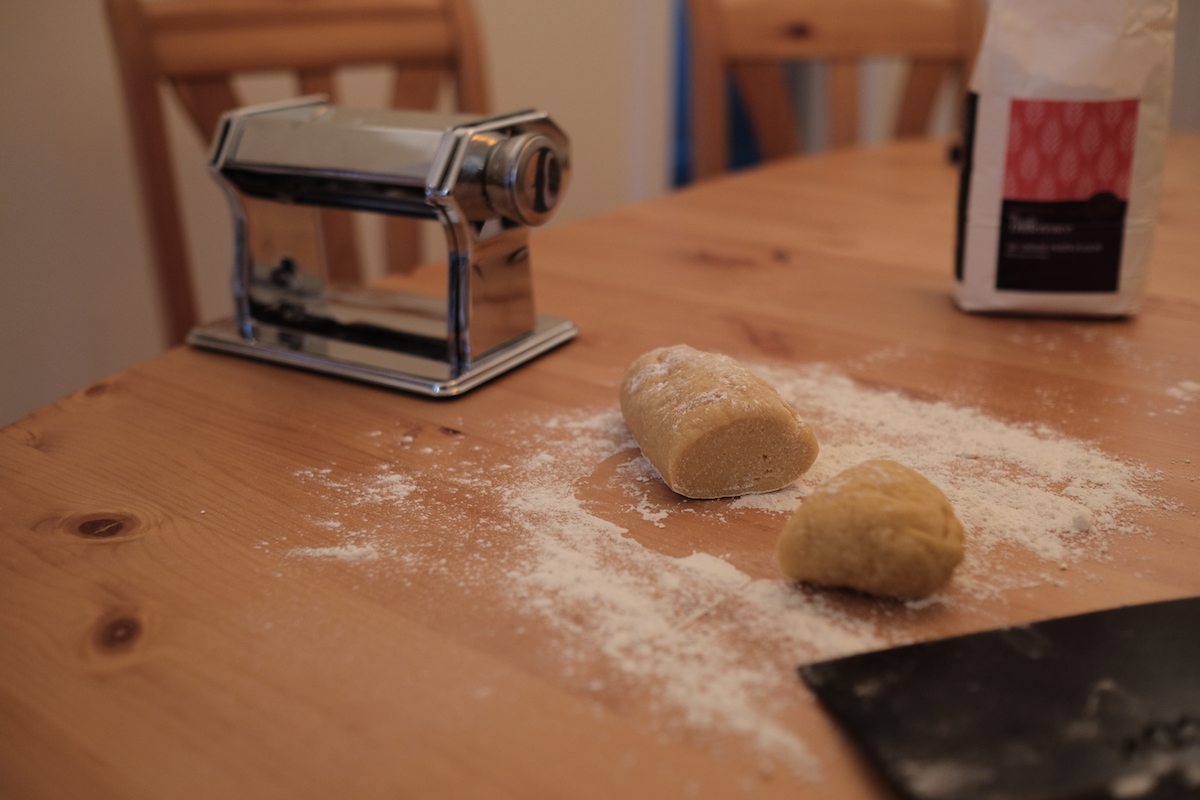
+ 175g 00 flour
+ 2 medium eggs (the fresher the better)
+ 25g fine semolina (or 25 more grams of flour)
If you don’t have any eggs or want to make vegan pasta, you can simply swap the eggs for 200g of water.
The method is to simply mix the ingredients together, then wrap in clip film and refrigerate for at least 30 minutes before rolling out and cooking. To mix the ingredients you can either use your hands (takes around 10 minutes) or blitz it in a food processor for 30 seconds. At first, it seems like the dough will not come together, but just keep mixing - it will get there eventually.
After refrigerating, you just need to roll out your pasta into whatever shapes you like. The easiest is most likely tagliatelle - you just need a rolling pin, a knife, and some elbow grease. You can also get a pasta roller for fairly cheap which will roll your sheets out in seconds.
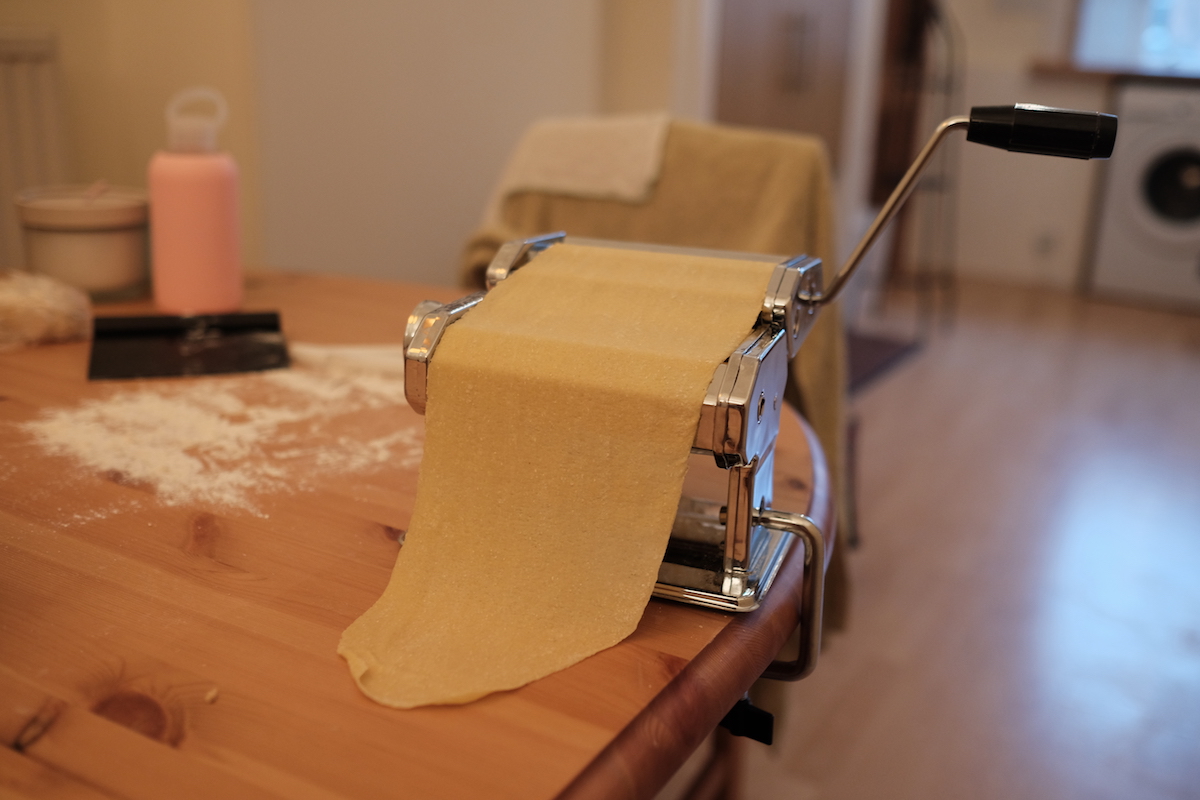
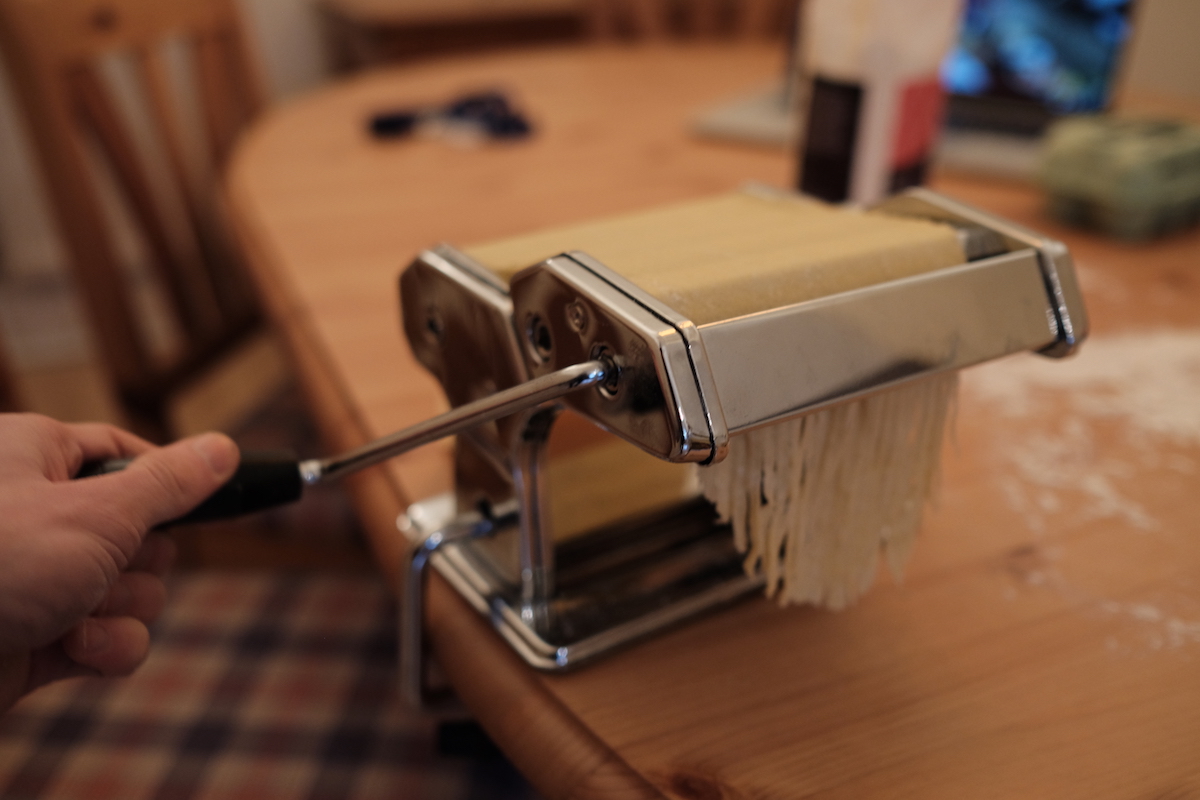
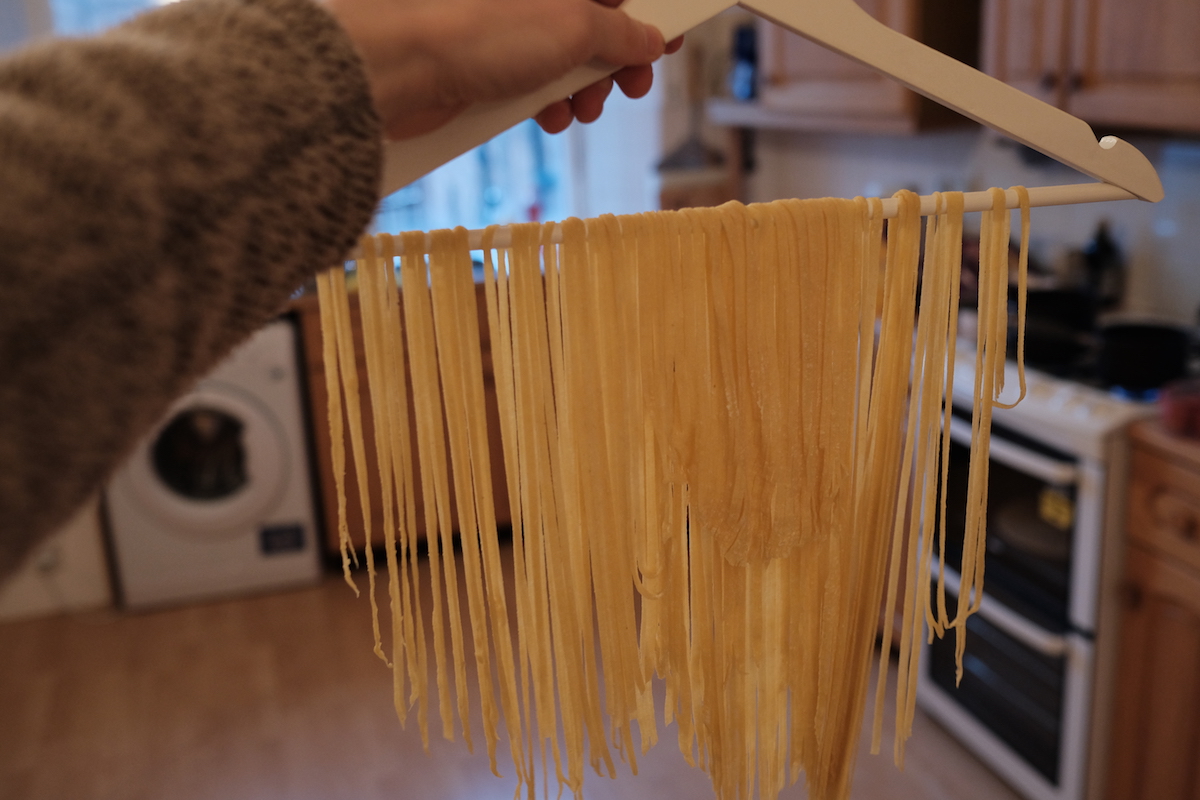
One last thing to note is that fresh pasta cooks much quicker than dried pasta - if you chuck this in this boiling water, it’ll be ready within 5 minutes. Also, you can leave the dough in your fridge for up to a week before using it.

My carbonara skills aren’t quite where I want them to be yet - I’m prone to scrambling the eggs when mixing everything together - but the flavor is that of some of the best pasta that I’ve had.
-
Animating Tab Bar Controller Taps
Following on from my previous animation posts (here and here), this post is about animating the taps on an iOS tab bar - an effect used by Spotify in their app. UITabBarController is an old piece of UIKit that draws its architecural design from AppKit. Configuring your tabs requires you to use UITabBarItem, you have no access to the internal UIBarButton class. Because of this, we have to use some less than ideal
valueForKeymethod - however, in this case I feel this is OK as there is no crticial operation relying on it, just an animation.For this effect, we also must subclass UITabBarController as we require access to the
didSelectItemmethod, the only available method forUITabBarControllerDelegateis thedidSelectViewControllerversion. You could perhaps look at the tabBarItems of a UITabBarController and look at its subviews and try and relate the two, but I imagine that it is unlikely you can guarantee that they will be equally ordered.The next best option I can think of is to roll your own version of UITabBarController where you control all the views and touch events and can do all the animation you want. But, if a subclass and short solution suits you, then read on.
class AnimatedTabBarController: UITabBarController { override func tabBar(_ tabBar: UITabBar, didSelect item: UITabBarItem) { guard let barButtonView = item.value(forKey: "view") as? UIView else { return } let animationLength: TimeInterval = 0.3 let propertyAnimator = UIViewPropertyAnimator(duration: animationLength, dampingRatio: 0.5) { barButtonView.transform = CGAffineTransform.identity.scaledBy(x: 0.9, y: 0.9) } propertyAnimator.addAnimations({ barButtonView.transform = .identity }, delayFactor: CGFloat(animationLength)) propertyAnimator.startAnimation() } } -
Animating UICollectionView or UITableView Cell Touches
Following on from my previous post about the animation of UIButtons, I wanted to look at animating UITableView or UICollectionView cell touches. This effect is used in the AppStore on the Today page alongside a great transition delegate for opening and closing articles.
I’m fairly happy with how this implementation works but will need to some more testing on a device to finalise the ‘feel’. Also, I would not be surprised if there is a simpler way of doing this. This here has been my first stab at it, and if I come up with something better I will be sure to post an update.
To create this effect I used a UILongPressGestureRecognizer.
let longPressRecognizer = UILongPressGestureRecognizer(target: self, action: #selector(didTapLongPress))
longPressRecognizer.minimumPressDuration = 0.05
longPressRecognizer.cancelsTouchesInView = false
longPressRecognizer.delegate = self
collectionView.addGestureRecognizer(longPressRecognizer)
We then need to conform to UIGestureRecognizerDelegate and implement the following method. If you have other gesture recognizers for this delegate then you will likely need more logic here, but for this simple example we are just going to return true all the time.
func gestureRecognizer(_ gestureRecognizer: UIGestureRecognizer, shouldRecognizeSimultaneouslyWith otherGestureRecognizer: UIGestureRecognizer) -> Bool {
    return true
}
Now for handling that gesture recognizer.
@objc func didTapLongPress(sender: UILongPressGestureRecognizer) {
    let point = sender.location(in: collectionView)
    let indexPath = collectionView.indexPathForItem(at: point)

    if sender.state == .began, let indexPath = indexPath, let cell = collectionView.cellForItem(at: indexPath) {
        // Initial press down, animate inward, keep track of the currently pressed index path

        animate(cell, to: pressedDownTransform)
        self.currentIndexPath = indexPath
    } else if sender.state == .changed {
        // Touch moved
        // If the touch moved outwidth the current cell, then animate the current cell back up
        // Otherwise, animate down again

        if indexPath != self.currentIndexPath, let currentIndexPath = self.currentIndexPath, let cell = collectionView.cellForItem(at: currentIndexPath) {
            if cell.transform != .identity {
                animate(cell, to: .identity)
            }
        } else if indexPath == self.currentIndexPath, let indexPath = indexPath, let cell = collectionView.cellForItem(at: indexPath) {
            if cell.transform != pressedDownTransform {
                animate(cell, to: pressedDownTransform)
            }
        }
    } else if let currentIndexPath = currentIndexPath, let cell = collectionView.cellForItem(at: currentIndexPath) {
        // Touch ended/cancelled, revert the cell to identity

        animate(cell, to: .identity)
        self.currentIndexPath = nil
    }
}
Here, I am handling three different ‘states’ for the gesture recognizer. If we a touch began, then so long as that touch was on a cell, we animate the cell. If a touch moved outside a cell, we animate it back to normal, if it move back inside the cell, we animate to pressed again. Finally, if the touch ends or is cancelled, then we animate back to normal.
You might notice as well a couple of new variables here being used.
var currentIndexPath: IndexPath?
let pressedDownTransform =  CGAffineTransform.identity.scaledBy(x: 0.98, y: 0.98)
‘currentIndexPath’ is just a reference to the index path of the cell that was pressed down. The transform is being stored as an instance variable simply to avoid redoing the scale everytime the gesture recognizer is called.
Now the only missing piece is the animation function. This is very simple and acts much like the one I used in my animating UIButton post.
private func animate(_ cell: UICollectionViewCell, to transform: CGAffineTransform) { UIView.animate(withDuration: 0.4, delay: 0, usingSpringWithDamping: 0.4, initialSpringVelocity: 3, options: [.curveEaseInOut], animations: { cell.transform = transform }, completion: nil) } -
Animating UIButton Presses In Swift
Animation can vastly improve user experience in an application. I love buttons that animate and give you the feeling that you are actually pressing something. These combined with the great TapticEngine APIs (UIFeedbackGenerator) can completely change the way your application feels.
Here are a couple of ways of doing button animations in Swift - both of which utilise UIButton addTarget methods.
Vanilla UIKit Method
extension UIButton {

    func startAnimatingPressActions() {
        addTarget(self, action: #selector(animateDown), for: [.touchDown, .touchDragEnter])
        addTarget(self, action: #selector(animateUp), for: [.touchDragExit, .touchCancel, .touchUpInside, .touchUpOutside])
    }

    @objc private func animateDown(sender: UIButton) {
        animate(sender, transform: CGAffineTransform.identity.scaledBy(x: 0.95, y: 0.95))
    }

    @objc private func animateUp(sender: UIButton) {
        animate(sender, transform: .identity)
    }

    private func animate(_ button: UIButton, transform: CGAffineTransform) {
        UIView.animate(withDuration: 0.4,
                       delay: 0,
                       usingSpringWithDamping: 0.5,
                       initialSpringVelocity: 3,
                       options: [.curveEaseInOut],
                       animations: {
                        button.transform = transform
            }, completion: nil)
    }

}
If you are not using RxSwift or RxCocoa, this method should work just as well. The only downside is that you once a button becomes animatable, you have no way of making it un-animatable.
RxSwift + RxCocoa
This is my preferred method of making generic animations. The benefit of using RxSwift is that you start and stop animating button presses - should you wish to - simply by disposing the DisposeBag that you pass in. It also avoids you having to @objc expose your control event methods.
import RxSwift
import RxCocoa

extension UIButton {

    func animateWhenPressed(disposeBag: DisposeBag) {
        let pressDownTransform = rx.controlEvent([.touchDown, .touchDragEnter])
            .map({ CGAffineTransform.identity.scaledBy(x: 0.95, y: 0.95) })

        let pressUpTransform = rx.controlEvent([.touchDragExit, .touchCancel, .touchUpInside, .touchUpOutside])
            .map({ CGAffineTransform.identity })

        Observable.merge(pressDownTransform, pressUpTransform)
            .distinctUntilChanged()
            .subscribe(onNext: animate(_:))
            .disposed(by: disposeBag)
    }

    private func animate(_ transform: CGAffineTransform) {
        UIView.animate(withDuration: 0.4,
                       delay: 0,
                       usingSpringWithDamping: 0.5,
                       initialSpringVelocity: 3,
                       options: [.curveEaseInOut],
                       animations: {
                        self.transform = transform
            }, completion: nil)
    }

}
This bit of Rx revolves around mapping button events to an animation state. For touch-down or touch-drag-enter events, we want to animate the press down action of the button, this ‘pressed’ state is represented by
CGAffineTransform.identity.scaledBy(x: 0.95, y: 0.95). For all other touch events we want to animate back to theidentity(the default) transform. For more info on how transforms work, check out this article by HackingWithSwift. These transform mappings are both merged and subscribed to the animate transform function which simply calls the animateTransform function whenever a new event is received. -
Swift Compile Time Cheat Sheet
If you are ever trying to get the compile time of a particular function down then hopefully the following examples will be of some use. For me, the best option from the following examples is to split long functions into smaller, composite functions.
To easily see the compile times of functions I created an empty project and added an
Other Swift Flags(this can be found inside$Your Project->Build Settings->Swift Compiler - Custom Flags) of-Xfronted -warn-long-function-bodies=1. Doing this means Xcode will warn you everytime that you build if any function in your project took longer than 1 millisecond to type check.Please note that these examples are just that - examples. Your mileage may vary and I would recommend not to take these as must-dos. In most cases, it makes more sense to write code that is clear and understandable - not code that compiles quickly but is confusing to yourself and others.
String
// Option A - 30ms
let xText = "x"
let _ = x.appending(" y")

// Option B - 45ms
let yText = "y"
let _ = "x \(otherString)"

// Option C - <1ms
let xText: String = "x"
let _ = x.appending(" y")

// Option D - 1ms
let yText: String = "y"
let _ = "x \(yText)"
As you might expect, if you explicitly tell the compiler what type the values are, then you have significantly faster compile times. Option C was the only function body that did not prompt a warning for compile time being >= 1ms. Option D only took 1ms though so the difference is negligible.
Optional Unwrapping
let item: String?

// Option A - <1ms
let _ = item ?? "some other string"

// Option B - <1ms
guard let _ = item else { return }
I had often suspected
??to be slower to type check than a guard or if let function but in this short example there appears to be no significant difference.Mapping
let x = ["5", "101", "a", "awe"]

// Option A - 5ms
let _ = x.map {
            $0.uppercased()
        }

// Option B - <1ms
let _ = x.map { text in
            return text.uppercased()
        }

// Option C - <1ms
let _ = x.map { (text: String) -> String in
            return text.uppercased()
        }
Interestingly, simply naming your arguments significantly reduces compile-time - even if you don’t explicitly type the named arguments.
Custom Subscripts
A nice feature of Swift is its ability to add custom subscripts. The most common one I’ve seen used is the safe operator to safely access array values.
extension Collection {

    subscript (safe index: Indices.Iterator.Element) -> Iterator.Element? {
        guard indices.contains(index) else { return nil }
        return self[index]
    }

}
let x = ["5", "101", "a", "awe"] // Option A - 50ms let _ = x[safe: 2] // Option B - 7ms let value: String? if x.indices.contains(2) { value = x[2] } else { value = nil } // Option C - <1ms guard x.indices.contains(2) else { return } let _ = x[2]The subscript option is clearly the cleanest implementation, but annoyingly it also takes the longest to compile by a good amount.
Splitting Up Long functions
For this example, I’ve taken some sample UITableViewCell code and have two options. One option has all the setup in one function. The other option has three functions, one function does half the setup, another the other half and the main function calls the other two. The time I’ve recorded is the total time for both options.
// Option A - 17ms
func longFunctionAllInOne() {
    selectionStyle = .none
    layer.cornerRadius = 4
    clipsToBounds = true

    contentView.clipsToBounds = true
    contentView.layer.cornerRadius = 4
    contentView.backgroundColor = .gray
    contentView.addSubview(rightAccessoryImageView)
    contentView.addSubview(brandImageView)
    contentView.addSubview(labelStack)

    rightAccessoryImageView.image = UIImage(named: "")
    rightAccessoryImageView.transform = CGAffineTransform(rotationAngle: .pi / -2)
    rightAccessoryImageView.tintColor = .white

    labelStack.addArrangedSubview(enterNowLabel)
    labelStack.addArrangedSubview(nowLabel)
    labelStack.axis = .vertical
    labelStack.spacing = 2

    enterNowLabel.textColor = .white
    enterNowLabel.textAlignment = .right
    enterNowLabel.font = UIFont.systemFont(ofSize: 13)
    enterNowLabel.setContentCompressionResistancePriority(.required, for: .horizontal)

    nowLabel.textColor = .white
    nowLabel.textAlignment = .right
    nowLabel.font = UIFont.systemFont(ofSize: 12)
    nowLabel.setContentCompressionResistancePriority(.required, for: .horizontal)
}

// Option B (cumulative) - 2ms
func splitFunctions() {
    splitInto2_part1()
    splitInto2_part2()
}

func splitInto2_part1() {
    selectionStyle = .none
    layer.cornerRadius = 4
    clipsToBounds = true

    contentView.clipsToBounds = true
    contentView.layer.cornerRadius = 4
    contentView.backgroundColor = .gray
    contentView.addSubview(rightAccessoryImageView)
    contentView.addSubview(brandImageView)
    contentView.addSubview(labelStack)

    rightAccessoryImageView.image = UIImage(named: "")
    rightAccessoryImageView.transform = CGAffineTransform(rotationAngle: .pi / -2)
    rightAccessoryImageView.tintColor = .white
}

func splitInto2_part2() {
    labelStack.addArrangedSubview(enterNowLabel)
    labelStack.addArrangedSubview(nowLabel)
    labelStack.axis = .vertical
    labelStack.spacing = 2

    enterNowLabel.textColor = .white
    enterNowLabel.textAlignment = .right
    enterNowLabel.font = UIFont.systemFont(ofSize: 13)
    enterNowLabel.setContentCompressionResistancePriority(.required, for: .horizontal)

    nowLabel.textColor = .white
    nowLabel.textAlignment = .right
    nowLabel.font = UIFont.systemFont(ofSize: 12)
    nowLabel.setContentCompressionResistancePriority(.required, for: .horizontal)
}
This example is perhaps the most useful of all the examples on this page. It is much better for compile time if you split your functions into smaller composite functions. The best thing about this is that generally this also results in more readable code.
-
Mini iPhone X Review
👍🏼
- Its screen is the best I’ve ever used - viewing anything edge-to-edge on this phone is a delight. The best way I can describe it is by saying it looks like it has been superimposed onto the phone using CGI.
- The gestures for navigating between apps are second to none. Using a home button to move around iOS feels like a chore in comparison.
- The build quality is the best of any iPhone. This phone just feels great in your hand - in my opinion it is the perfect size and weight.
👎🏼
- Face ID is good, it is not great. It does not work when you are in bed; when your phone is on a desk (with your face slightly out of the view of the scanner); or sporadically in fairly normal conditions. Touch ID is more reliable and predicatable.
- Portrait + Lighting Modes are average at best. I’ve seen many people say portrait mode has improved significantly since its release. This, I am highly cynical of. Portrait mode probably wouldn’t be so disappointing if it wasn’t for the Google Pixel outperforming Apple’s offering using only one camera. Lighting modes are bad. Both effects need the absolute best lighting conditions (which are rarely available) to be any good.
- Wireless charging is pretty disappointing in my opinion. I am fairly sure that this phone (and the 8 and 8 Plus) only have glass backs so that they can do wireless charging. I would swap to a stainless steel backing - for robustness reasons - in an instant. Wireless chargers are slow, expensive and awkward to use. Apple have their own proprietary charging mat coming soon which is supposed to be easier to use. But, it is going to be ridiculously expensive and it has been delayed for months.